This page features information training and handling with rear crosses. You’ll find foundation drills, short sequences, handling advice and more.
Sign up for our newsletter to stay up-to-date on new resources.
Defining a Rear Cross
A rear cross is a handling maneuver that allows the handler to switch from one side of the dog to their other side by passing behind the dog. This type of cross has two key components that allow all rear crosses to function as a handling move. The dog must be able to run ahead of the handler and the dog must understand which cues (e.g. foot position, verbal command) signal that the handler is going to pass behind them and that the dog should turn in response.
Training for the Key Components of Rear Crosses
On jumping sequences and between obstacles, rear crosses signal a change of direction. How the handler approaches the jump determines how tight the dog turns and which direction the dog runs next. While rear crosses are most commonly used on turns throughout an agility course a turn on course is not a requirement for rear crosses. When rear crossing a contact obstacle or a tunnel the handler can switch sides behind the dog without the dog’s path turning.
1. The dog must be able to move ahead of the handler.
Stalling out at a rear cross is a common issue for dog-handler teams. If the handler and dog arrive at the rear cross point at the same time, the handler’s approach puts too much pressure on the dog. You may see your dog slow down to make way for you or turn pre-maturely.
If your team runs out of momentum headed into rear crosses, you may need more forward commitment to the jump.
Forward Commitment for Rears
To train forward commitment for a rear cross use the foundation drill below.
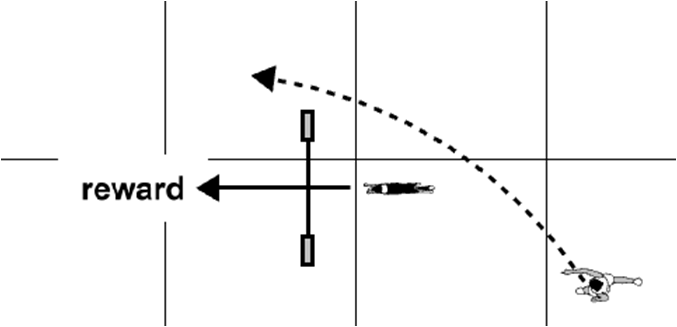
For this drill, the reward will be placed beyond the jump. This ensures that the dog is rewarded for being ahead of the handler. Our goal is to give your dog an easy destination ahead of you; you can place a treat on a target or place a toy ahead.
Step 1: Pre-place a reward ahead of the jump. Start with your dog by your side about 5ft from the jump. Release the dog ahead of you and give the obstacle’s name, “Jump!”, point forward and let your dog move ahead of you to go get the reward. As your dog moves ahead of you, follow them. You should only be a step or two behind your dog. This adds support in the form of common motion which is important while your dog is still learning to move ahead of you independently.

If successful, repeat the drill starting further away from the jump (e.g. 6ft away, 7ft away and so on). And, delay how quickly you follow them until you can stand stationary while the dog goes ahead to get their reward.
Other variations of step 1 will also help reinforce the dog’s forward commitment.
Step 2: Pre-place a reward ahead of the jump. Start with your dog by your side, and release the dog ahead of you and give the obstacle’s name, “Jump!”. As your dog moves ahead of you, step behind their path and follow them on the “new” side. Be sure to let your dog be a stride or two ahead of you, you don’t want to accidently step into them! This would deter their forward commitment to the jump.
If you’re re-training rear crosses with an experienced dog, be sure to use destinations when returning to sequencing with rear crosses. Click to read more about reward placements.
2. The dog must understand which cues signal that the handler is going to pass behind them.
When using a rear cross to turn your dog on course, you need your dog to read rear cross cues efficiently. Often dogs will see their handler cross behind them and turn in the opposite direction or not turn at all! This spin is due to confusion or lack of competence; your dog does not know what behavior they should respond with after the rear cross cues are presented.
To help your dog better understand rear cross cues use the foundation drill below.
Cues for a Rear Cross
Select an object for your dog to go around; this can be any object like a cone, jump wing or tree. Then, select a rear cross verbal cue – like, “Back”, “Flip” or use a “Left”/“Right”. This verbal cue will tell the dog that they are turning away from the handler once they are ahead.
Step 1: Start with your dog on your right side in front of the object. Move to the left of the object so that your dog is between you and the object. Be sure to always give your dog enough space to comfortably fit between you and the wing. Then lure your dog’s nose to their right and help them turn around the object. As you do so, give your rear cross verbal cue and turn with the dog to reward them from your left hand. You physically turning your body provides important information for your dog during a rear cross, you may want to exaggerate these movements for dogs beginning to learn rear crosses.
You have successfully crossed behind your dog’s path and switched to their other side. Yay!
Now, repeat by starting with the dog beginning on your right side. This time you will move to the left of the object and ask your dog to turn to the right. Reward from the left hand after you cross behind the dog to the new side.
As your dog succeeds you can fade away the luring, move farther away from the jump and increase the speed with which you approach the rear cross.
Types of Rear Crosses
While all rear crosses allow the handler to switch sides, not all rear crosses give the same information to the dog. Where you want the dog to turn on course and how you cross your dog’s path impact how efficient a rear cross will be as a handling maneuver. This section identifies four common types of rear crosses
Converging Rear Cross
For a converging rear cross look for places on course where the dog’s line turns over the jump. How the handler converges on the dog’s line (i.e. how the handler’s path crosses the dog’s path) determines the tightness of the turn. The direction the handler goes after the rear cross helps indicate to the dog which obstacle is next on course.
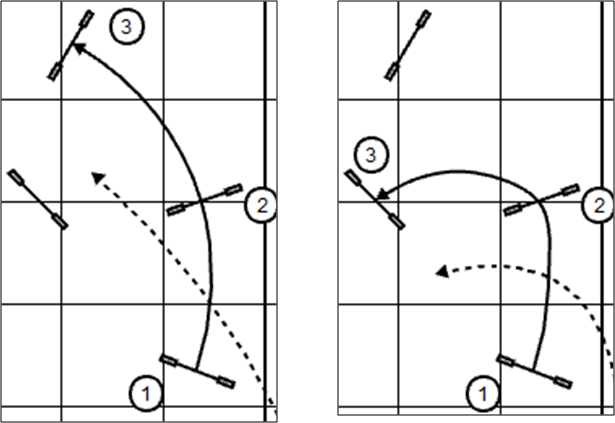
and tighter turn (on right).
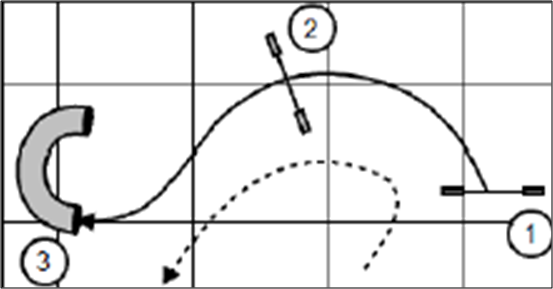
Rear Cross on the Flat
For a rear cross on the flat the dog’s path turns on the ground between two obstacles on course. The handler’s line should parallel the dog’s ideal path. Often pulling the dog away from potential off courses before “flipping” the dog back to the correct next obstacle.
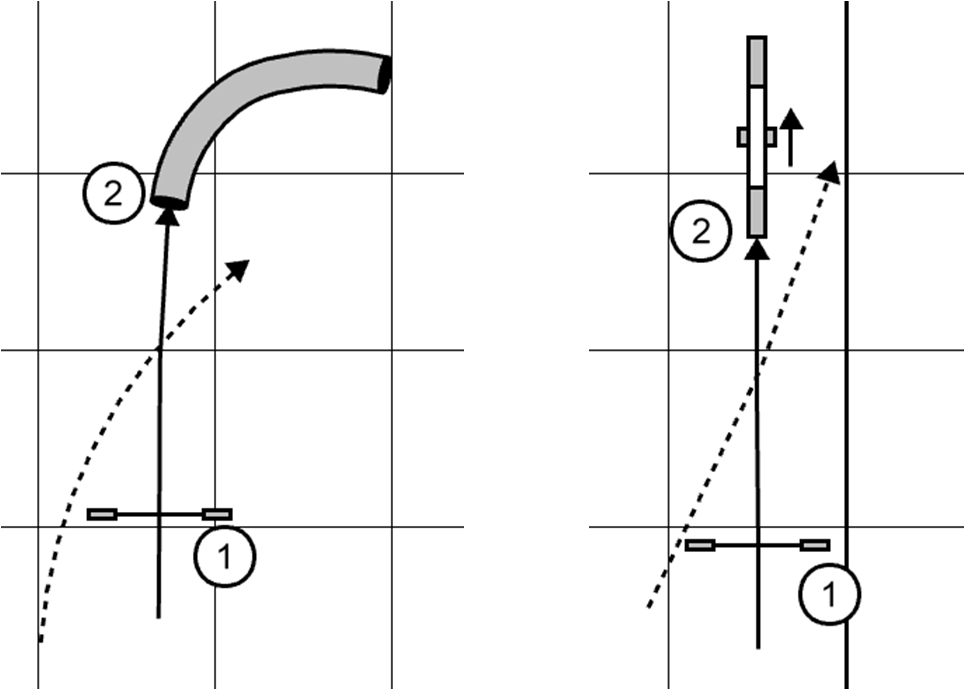
Slice Rear Cross
For a slice rear cross the dog’s line is diagonal over the jump and turns on landing. The handler should maintain a straight path to encourage the dog to not bend in their line. Once the dog is committed to jumping forward on the diagonal, the handler can turn and cue the rear cross to cause a turn on landing.
Creating a curve causes several issues as shown in the image on the right below; 1) back jumping, 2) turning the wrong way, or 3) a wider turn.

and potential mistakes (on right)
Straight Line Rear Cross
For a rear cross on a straight line allows the handler to switch sides behind the dog without causing a turn. This is easiest to do on obstacles that have a pre-set exit, like weaves, tunnels and contact equipment.
Be aware that showing a straight line rear cross over jumps may deteriorate your turning cue when using one of the three other types of rear crosses. You can help by cuing the dog with the obstacle name, to reinforce forward commitment, and opt not to use your rear cross cue which indicates a turn to the dog.
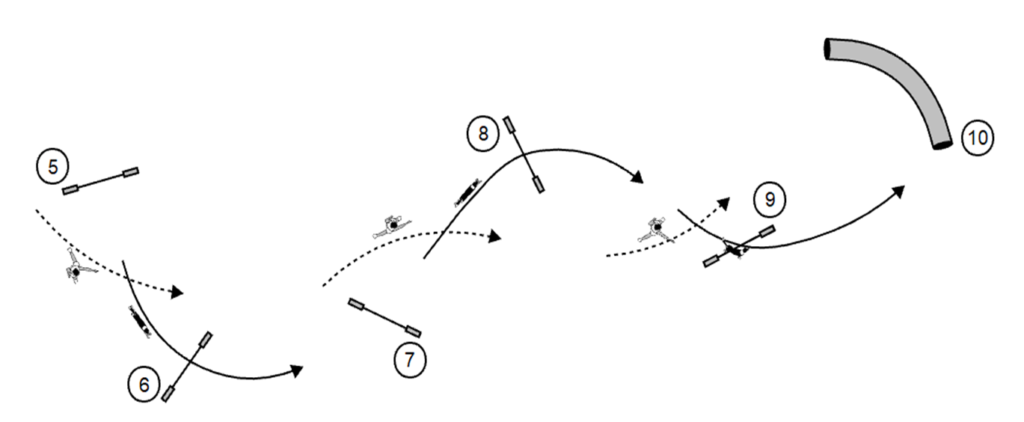
Handling for the Off Side of a Tunnel
A common challenge on agility courses is for the dog to discriminate between two logical entrances of a tunnel. Often handlers will be caught behind or not have the opportunity to block the incorrect end from the dog’s view. In these scenarios, you’re handling the off side of the tunnel with a rear cross on the flat.
Here are a few handling tips to help you and your dog successfully navigate pulling to the off side of a tunnel.
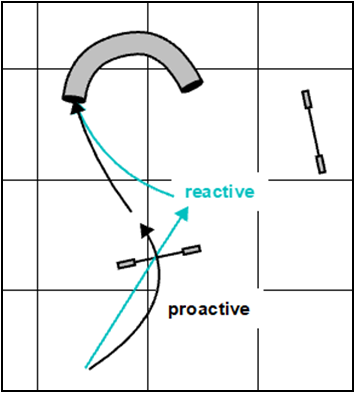
Handling Tip #1: Be Proactive, Not Reactive.
When pulling to the off side of a tunnel tunnel, the course flow may set the dog up on the wrong line. Waiting until your dog lands in the wrong direction (i.e. facing the wrong end of the tunnel), and then calling them is reactive handling. This makes it harder for the dog to choose the correct side, and the dog may already be committed to the wrong tunnel entrance. Instead, be proactive! Help your dog before they take off, by shaping the turn, using a spin or cuing a turn. Now, your dog will land on the correct path. This minimizes the chance of an off course by making the correct tunnel entrance the easier choice!
Handling Tip #2: Parallel the Dog’s Line
To help your dog stay on the correct path to the tunnel, the handler should parallel their line. This means, if you want the dog’s line to go to the tunnel you MUST stay off their line! Stepping towards the correct tunnel entrance may push them to the wrong entrance.
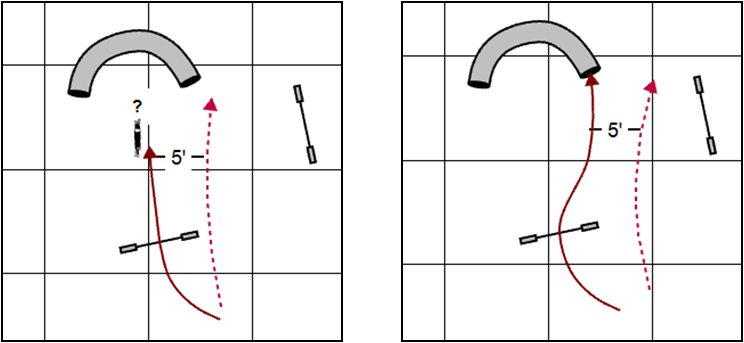
Typically staying 5ft away from your dog is adequate, but this may vary depending on your dogs normal working distance (aka: how far they usually work from you). When in doubt, run farther away from the tunnel.